Rubberduck - Highly Available, Autoscaling EC2 instances with Bastion
vpc awsLearned how to build a VPC with high availability, auto-scaling EC2 instances, and a bastion host for secure administration.
On a high-level, you’d you want your architecture to look more or less like this:
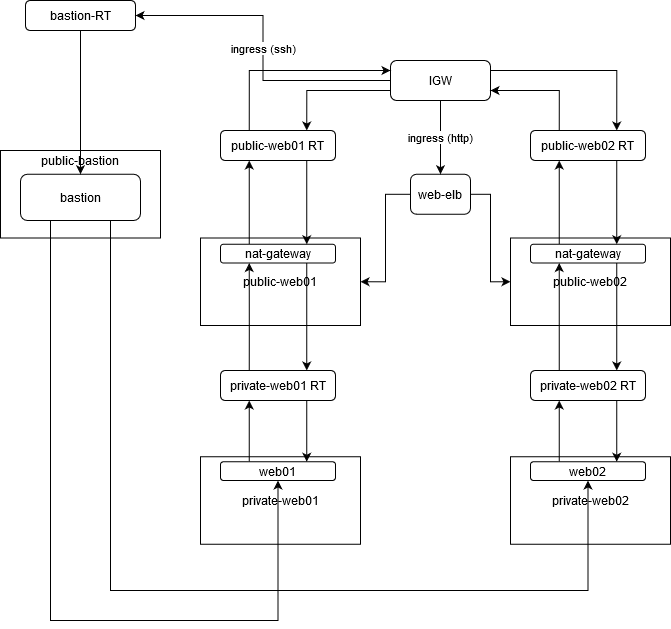
It’s a lot to go over, so we’ll cover each piece step by step.
First, create a Virtual Private Cloud (VPC). AWS will create some default components to go along with it, but we’ll be ignoring those.
Next, create the following subnets in different availability zones:
public-web01(enable auto-assign public ip)public-web02(enable auto-assign public ip)private-web01(same AZ aspublic-web01)private-web02(same AZ aspublic-web02)public-bastion(enable auto-assign public ip)
The public-* subnets will represent our demilitarized zone (DMZ). In other words, this space will be exposed to the internet. We create separate subnets for our -web and -bastion hosts as we’ll be managing those separately; the former will allow for HTTP access, while the latter will only allow ssh access. We also create two -web pairs of public and private subnets, as it is good practice to have your load balancer route to at least two subnets for high availability.
The -web subnets are for the web servers; this will be how traffic will get to/from the internet to/from your application. The public-bastion subnet, on the other hand, is for a bastion host. Our architecture limits the attack surface of your system to a single, hardened host, which we will ssh into for managing our internal servers.
The actual web servers will lie within the private-web subnets. This allows us to restrict SSH connectivity to/from the bastion host, while allowing HTTP traffic through the public-web subnets.
Create the following security groups:
web01web02web-dmzbastion
web01 and web02 will be used to manage traffic to/from instances within the private-web subnets. web-dmz represents the security group for our load balancer. bastion is for our bastion host.
These security groups need to be configured in such a way that traffic is only limited to sources based on our architecture. The web01 and web02 security groups must only accept HTTP traffic from the web-dmz security group and ssh traffic from the bastion security group. web-dmz must only accept HTTP traffic from the ipv4 and ipv6 CIDR blocks, while bastion must only accept ssh traffic from the ipv4 and ipv6 CIDR blocks.
Create an internet gateway to allow ingress/egress to/from our VPC.
Create NAT Gateways, one for each of our public-web subnets.
Create a bastion host on our public-bastion network. Assign it the bastion security group.
Create launch configurations and autoscaling groups for each of our web clusters. web01 will have a launch configuration group named web01, and an autoscaling group named web01. The same should be done for web02.
Create an application load balancer. Configure it to be internet-facing. Make sure it routes to our public-web subnets. Register the instances from our web autoscaling groups, then assign it the web-dmz security group.
We’ll need route tables to route traffic between each of our components in our VPC. You’ll need to create the following:
public-web01public-web02private-web01private-web02bastion
Each of our public-web subnets should be configured to route 0.0.0.0/0 and ::/0 (the CIDR blocks for ipv4 and ipv6 addresses, respectively) to the internet gateway. The same goes for the bastion route table. Each private-web route table should be configured to route the aforementioned CIDR blocks to their respective public-web subnets’ NAT gateways. After doing so, associate these route tables with their respective subnets.
Once your load balancer and autoscaling groups have completely initialized, we’ll need to install httpd and write index.html files in each of our EC2 instances. scp into your bastion host like so:
ssh -i /path/to/your/pem/file ec2-user@<your bastion's public ip>
From there, we’ll need to ssh into each of our EC2 instances and run the following script:
#!/bin/bash

set -e
yum install httpd -y
service httpd start
chkconfig httpd on
cd /var/www/html
echo "<html><h1>This is $name_of_web_cluster</h1></html>" > index.html
ssh into each internal web server. Write the above script into a file (be sure to replace $name_of_web_cluster with the name of the web cluster that the instance is supposed to represent, e.g. web01 or web02). Run chmod u+x to set the executable bit, and execute it with sudo.
* note: there are several ways to securely ssh into your internal EC2 instances, but the quickest would be to scp the pem file you’ve associated with each autoscaling group, and ssh -i with that file from your bastion host.
After installing httpd and writing the index.html files, you can ping your servers from your terminal with the following one-liner.
elb_public_dns=<your load balancer's public dns>; for i in $(seq 1 1000); do printf "%s" "healthcheck"; for j in $(seq 1 3); do sleep 1; printf "%s" "."; done; printf "\n" ""; printf "%s%s\n" "$(date) =>" "$("${elb_public_dns}" 2>/dev/null)"; done
You should see output similar to this:
Sun May 10 11:09:37 DST 2020 =><html><h1>This is web01</h1></html>
healthcheck...
Sun May 10 11:10:01 DST 2020 =><html><h1>This is web01</h1></html>
healthcheck...
Sun May 10 11:10:05 DST 2020 =><html><h1>This is web02</h1></html>
healthcheck...
Sun May 10 11:10:08 DST 2020 =><html><h1>This is web01</h1></html>
As you can see, the output alternates between our web01 and web02 web servers.
In summary:
- Create a VPC.
- Create the ff. subnets in different AZs:
public-web01(enable auto-assign public ip)public-web02(enable auto-assign public ip)private-web01(same AZ aspublic-web01)private-web02(same AZ aspublic-web02)public-bastion(enable auto-assign public ip)
- Create the ff. security groups:
web01- inbound:
- HTTP from ipv4 and ipv6 all
- HTTPS from ipv4 and ipv6 all
- SSH from ipv4 and ipv6 all
- inbound:
web02- inbound:
- HTTP from ipv4 and ipv6 all
- HTTPS from ipv4 and ipv6 all
- SSH from ipv4 and ipv6 all
- inbound:
web-dmz- inbound:
- HTTP from ipv4 and ipv6 all
- HTTPS from ipv4 and ipv6 all
- inbound:
bastion- inbound:
- SSH from ipv4 and ipv6 all
- inbound:
- Create an IGW.
- Create a NAT Gateway for each
public-websubnet. - Create a bastion host:
public-bastionsubnetbastionsecurity group
- Create launch configurations:
web01web01security group
web02web02security group
- Create autoscaling groups:
web01private-web01subnetweb01launch configuration
web02private-web02subnetweb02launch configuration
- Create an application load balancer:
- internet-facing
- route to public subnets:
public-web01public-web02
- register instances from autoscaling groups:
web01web02
web-dmzsecurity group
- Create the ff. route tables:
public-web01- subnet associations:
public-web01
- routes:
10.0.0.0/16=>local- ipv4 and ipv6 all => IGW
- subnet associations:
public-web02- subnet associations:
public-web02
- routes:
10.0.0.0/16=>local- ipv4 and ipv6 all => IGW
- subnet associations:
private-web01- subnet associations:
private-web01
- routes:
10.0.0.0/16=>local- ipv4 and ipv6 all => NAT Gateway on
public-web01
- subnet associations:
private-web02- subnet associations:
private-web02
- routes:
10.0.0.0/16=>local- ipv4 and ipv6 all => NAT Gateway on
public-web02
- subnet associations:
bastion- subnet associations:
public-bastion
- routes:
10.0.0.0/16=>local- ipv4 and ipv6 all => IGW
- subnet associations:
- Wait for provisioning.
curlwith this one-liner:
elb_public_dns=<your load balancer's public dns>; for i in $(seq 1 1000); do printf "%s" "healthcheck"; for j in $(seq 1 3); do sleep 1; printf "%s" "."; done; printf "\n" ""; printf "%s%s\n" "$(date) =>" "$("${elb_public_dns}" 2>/dev/null)"; done